2025 Trends in Tool Kits for Tools & Gear for Every Homeowner (Winter, December)
Tools Needed
Safety Tips
- Always wear safety glasses to protect your eyes from debris.
- Use a dust mask when sanding or working with dusty materials.
- Wear ear protection to prevent hearing damage from loud power tools.
- Use gloves to protect your hands from cuts and scrapes.
- Wear knee pads when working on floors to avoid discomfort and injury.
- Keep blades sharp to avoid accidents caused by dull tools.
- Ensure tools are well maintained and lubricated to function safely.
- Keep a first aid kit accessible in case of minor injuries.
Before You Start / What to Know Up Front
As winter creeps in, many DIY enthusiasts start thinking about those projects that have been on the to-do list for too long. Whether you're a seasoned pro or just beginning your journey into home improvement, having the right tools and gear can make all the difference. I remember the first winter I decided to tackle some DIY projects; I was excited but overwhelmed, unsure of what I truly needed. I ended up buying a hodgepodge of tools that I thought would help, but many just sat unused.
This guide is for homeowners looking to evaluate their tool kits, understand what’s trending, and ensure they have the right gear to tackle their winter projects effectively. We’ll cover essential tools, safety tips, and even some tricks I’ve learned along the way to avoid common pitfalls. So grab a cup of cocoa, and let’s dive into the world of tools and gear for every homeowner.
Method Overview
In this guide, we’ll take a practical approach to understanding the tools that can make your life easier during the winter months. We’ll break it down into categories based on common DIY tasks—think home repairs, woodworking, and general maintenance. This approach works well because it focuses on what you need for specific projects rather than overwhelming you with every tool on the market.
However, if you’re looking for specialized tools for a unique project, this guide might not cover every niche item. For example, if you're planning to install a complex irrigation system or do advanced electrical work, you might need to look beyond general home improvement tools. But for the majority of winter projects, this will set you on the right path.
Deep Step Detail
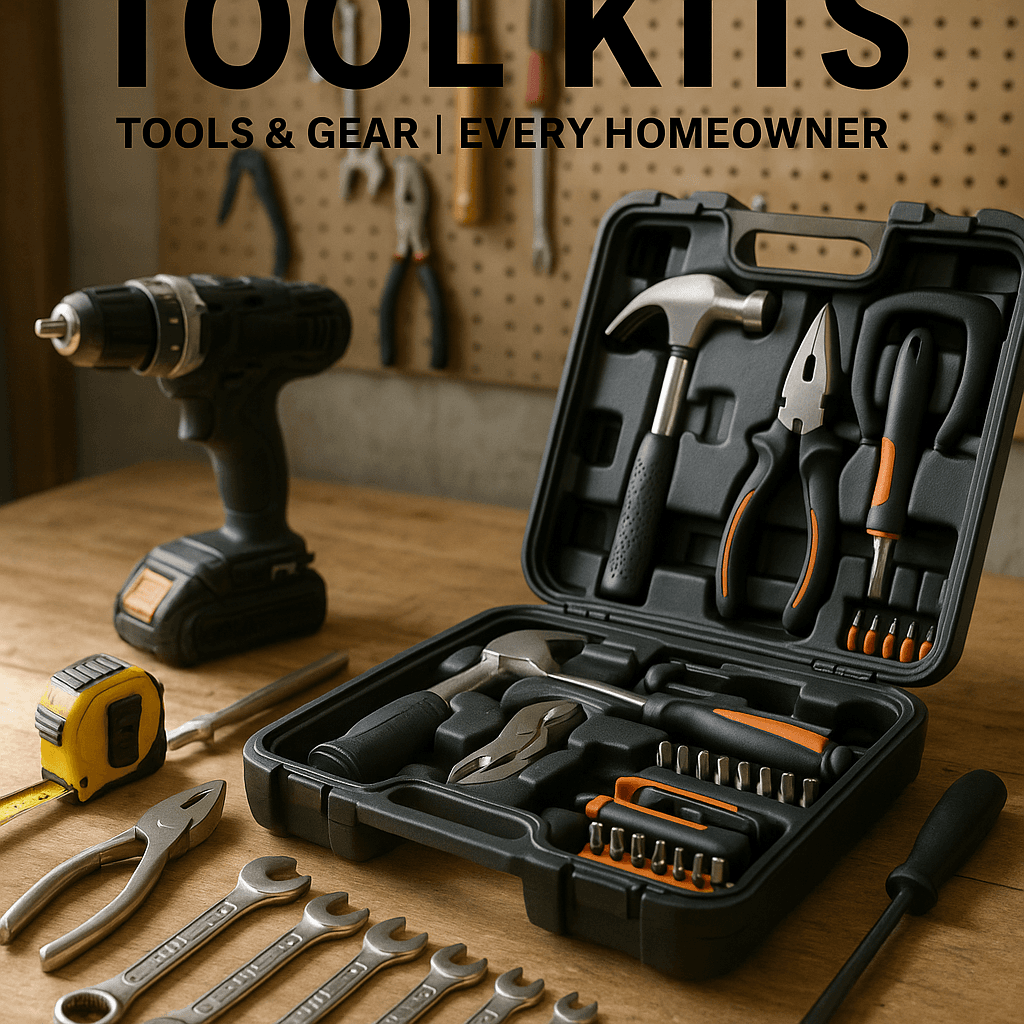
Let’s get into the nitty-gritty of building your tool kit. Here’s a structured approach to curating a tool collection that will serve you well this winter. We’ll tackle five essential categories: hand tools, power tools, safety gear, storage solutions, and maintenance supplies.
1. Hand Tools
Hand tools are the backbone of any DIYer’s toolkit. They don’t require electricity, and you can use them for a wide variety of tasks. Here’s what you should consider:
- Hammer: A good hammer is essential for driving nails and can also be used for demolition work. Look for a 16-ounce claw hammer, which is a comfortable weight for most tasks. I’ve found that a well-balanced hammer makes a world of difference in how easily you can drive a nail.
- Screwdrivers: A mixed set of Phillips and flathead screwdrivers will cover most needs. I recommend getting magnetized ones, as they’ll hold screws in place while you work. Avoid the temptation to use a flathead screwdriver on Phillips screws; it can strip the head and create more hassle down the line.
- Pliers: Needle-nose and slip-joint pliers are great for gripping, twisting, and cutting wire or small items. Many DIYers forget to check the jaws for wear—if they don't grip well, it’s time for a replacement.
- Tape Measure: An essential tool for any project, go for a 25-foot tape measure. It’s long enough for most tasks and compact enough to carry. Remember, if your tape measure doesn't retract smoothly, it may be time for a new one.
- Utility Knife: Perfect for cutting boxes, carpet, or any material that needs a clean edge. Choose one with replaceable blades for ease. Most DIYers I see forget that a dull blade can lead to accidents and jagged cuts.
2. Power Tools
Power tools can make your projects faster and more efficient. Here’s a basic set to consider:
- Drill/Driver: A cordless drill is a must-have. Look for one with variable speed settings and a good battery life. I’ve used brands like DeWalt and Milwaukee, which have never let me down. Remember to keep a spare battery charged, as running out mid-project is frustrating!
- Circular Saw: Great for cutting wood quickly and accurately. A 7-1/4 inch saw is a standard size for most DIY projects. If you’re new to this tool, always practice on scrap wood first to get comfortable with the controls.
- Sander: An orbital sander can save you hours of sanding by hand. Make sure to get a dust collection feature to minimize cleanup. I once tackled a large sanding job without dust control, and the mess took me longer to clean up than the project itself!
- Jigsaw: Perfect for intricate cuts in wood, metal, or plastic. It’s versatile and useful for many crafting projects. Just remember, using a dull blade can lead to frustrating results; keep a few sharp blades handy.
- Reciprocating Saw: If you’re planning any demolition work, a reciprocating saw will be your best friend. It cuts through wood and metal with ease. Don't forget to wear safety goggles, as debris can fly unexpectedly.
3. Safety Gear
Safety should always come first in any DIY project. Here are essential safety items you shouldn’t overlook:
- Safety Glasses: Protect your eyes from debris and dust. They should fit snugly and comfortably. I learned the hard way that a good pair makes all the difference in visibility and protection.
- Dust Mask: Whenever you’re sanding or working with materials that generate dust, wear a mask to protect your lungs. Don’t skimp on quality here; a good respirator can save you from long-term health issues.
- Ear Protection: Power tools can get loud, and prolonged exposure can damage your hearing. Invest in a good pair of earmuffs or earplugs. I always keep a pair in my tool bag so they’re never far away.
- Gloves: A sturdy pair of work gloves will protect your hands from cuts and scrapes while giving you a better grip on tools. Choose gloves that fit well; oversized gloves can be a hazard.
- Knee Pads: If you’re doing floor work or spending time on your knees, knee pads can save you a lot of discomfort. I’ve wished I’d worn them on many occasions!
4. Storage Solutions
Keeping your tools organized can save you time and frustration. Here’s how to keep everything in its place:
- Toolbox: A solid toolbox with compartments will help keep hand tools organized. Choose one that’s portable to easily move around the house. I recommend labeling compartments for quick access to tools.
- Pegboard: Installing a pegboard in your workshop or garage can keep tools visible and easily accessible. I love using pegboards because they make finding tools a breeze. Just be sure to use sturdy hooks that can support the weight of your tools.
- Shelving Units: Open shelving can be great for storing larger items and supplies. Look for sturdy shelves that can hold the weight of your gear. I once overloaded a flimsy shelf, and let’s just say it didn’t end well!
- Tool Bags: For smaller projects, a tool bag can help you carry your essentials without dragging a whole toolbox around. Choose one with plenty of pockets for organization.
- Magnetic Strips: These can be great for holding metal tools like screwdrivers and pliers right where you can see them. They save serious time digging through a toolbox!
5. Maintenance Supplies
Don’t forget about the supplies needed to keep your tools and home in good shape:
- Lubricants: Keep your tools functioning smoothly with a good lubricant like WD-40 or a silicone spray. Regular maintenance helps extend the life of your tools.
- Cleaning Supplies: Rags, brushes, and cleaners will help you keep your tools and workspace tidy. I recommend having a dedicated cleaning kit to make this easy.
- Batteries: Stock up on batteries for your cordless tools. Having extras on hand will save you from interruptions. I’ve had projects come to a halt because I forgot to check battery levels!
- Replacement Blades: For saws and utility knives, always have a few replacement blades so you can work without delay. Dull blades can lead to poor cuts and frustration.
- First Aid Kit: Accidents happen, and it’s wise to have a first aid kit handy, stocked with band-aids, antiseptic wipes, and gauze. I’ve learned the hard way that a quick bandage can make all the difference when working.
Troubleshooting & Fix-ups
As you start using your new tools, you may run into some hiccups. Here are a few common issues and how to resolve them:
Power Tool Issues
If your drill isn’t working, first check the battery. If it’s charged and still won’t turn on, it could be a problem with the motor. Sometimes, simply cleaning the connections can help. If your circular saw is making a strange noise, it might need lubrication or a blade change. Always ensure the blade is sharp; a dull blade can lead to kickback, which is a common hazard.
Hand Tool Problems
A common issue with hand tools is rust. If you notice rust on your tools, clean them with a rust remover and apply a light coat of oil to prevent future rusting. If a screwdriver slips while you’re working, it’s often because the screw is stripped. You can fix this by using a rubber band between the screwdriver and the screw to get a better grip.
Organization Challenges
If you find that your tools are still a mess even after organizing, consider reassessing your storage solutions. Sometimes, simply labeling boxes or using clear containers can make a world of difference in finding what you need quickly.
Common Mistakes & How to Avoid Them
Even with the best intentions, DIYers often make rookie mistakes. Here are some common pitfalls I've seen and how to sidestep them:
- Not Reading Instructions: Many people skip reading the manuals that come with tools. This can lead to improper use, which can be dangerous. Take the time to read the instructions and familiarize yourself with your tools before using them.
- Overlooking Safety Gear: It’s easy to think you can skip the safety glasses or gloves for a quick job, but accidents can happen in a split second. Always wear your safety gear, no matter how small the task seems.
- Neglecting Maintenance: Tools need care just like any other equipment. Forgetting to clean and maintain your tools leads to poor performance and can shorten their lifespan. Make it a habit to check and maintain your tools regularly.
- Not Practicing: If you get a new tool, practice with it on scrap materials first. Many DIYers dive right into a project without testing their tools, leading to mistakes and wasted materials. A little practice can save a lot of hassle!
- Ignoring Measurements: Measure twice, cut once is a mantra for a reason. Many mistakes happen because people rush measurements. Always take your time to ensure accuracy.
Pro Tips & Lessons Learned
After years of DIYing, I’ve picked up a few tricks that can save you time, money, and frustration:
- Buy Quality Tools: It might be tempting to go for the cheapest option, but investing in quality tools pays off in the long run. They last longer and perform better. Brands like Bosch, Makita, and Ryobi are reliable choices, and I’ve had my share of cheaper tools that just didn’t hold up.
- Keep a Project Journal: Documenting your projects, including what worked and what didn’t, can help you remember for next time and improve your skills. This has made a huge difference in my planning.
- Join a DIY Community: Whether it’s online or in-person, sharing tips and experiences with others can provide invaluable insight. Plus, it’s nice to have a support system that understands the DIY journey.
- Plan for Downtime in Projects: Sometimes projects take longer than expected. Build in some buffer time, especially for winter projects where weather can be unpredictable. I’ve learned to never underestimate a project’s timeline!
- Learn Basic Repairs: Knowing how to do basic repairs can save you money and give you confidence for bigger projects. Start with small fixes around the house and work your way up; it’s empowering to tackle things yourself.
Budget & Time Signals
When budgeting for your tool kit, it’s essential to understand what drives costs up or down:
- Quality vs. Quantity: Investing in a few high-quality tools can be more cost-effective than buying a large number of cheap tools that break easily. I’ve seen too many DIYers buy a bunch of low-cost tools only to find they need to replace them frequently.
- Project Type: The complexity of your projects will dictate your budget. Simple repairs may only require hand tools, while larger projects might necessitate more expensive power tools. Always assess what you’ll actually need for the job.
- Renting vs. Buying: For tools you’ll only use once, consider renting instead of buying. Many home improvement stores offer rentals for tools like concrete mixers or larger saws. This can save you money in the long run.
- Phased Buying: If money is tight, prioritize your purchases. Start with essential tools, and add to your collection as needed. It’s a smart way to manage your budget without overwhelming yourself.
- Sales & Discounts: Keep an eye out for seasonal sales, especially around the holidays. You can often find great deals on tools during these times, so it pays to plan your purchases.
When to Call a Pro
While DIY can be rewarding, some projects are best left to the professionals. Here are warning signs to look out for:
- Complex Electrical Work: If you’re not comfortable with wiring, it’s best to call an electrician. Mistakes can be dangerous, and it’s not worth the risk.
- Structural Changes: If your project involves removing walls or significant modifications, consult a contractor to ensure safety and compliance with building codes. This is crucial for your home’s integrity.
- Plumbing Issues: If you’re not familiar with plumbing, it’s easy to cause leaks or other issues. Call a plumber for complex jobs; a small mistake can lead to costly repairs.
- Large Demolition Projects: For big jobs, like removing large sections of flooring or walls, it may be safer and more efficient to hire a pro. Sometimes it’s just not worth the hassle.
- Time Constraints: If you’re short on time and the project is critical, hiring a professional can save you stress and ensure quality work.
Conclusion
As you prepare for winter and the DIY projects that come with it, remember that having the right tools and gear can set you up for success. Take the time to evaluate your current tool kit, invest in quality items, and practice safety at all times. The satisfaction of completing projects yourself is rewarding, and with the right preparation, you can tackle this winter with confidence.
So, what’s the next step? Start by taking an inventory of your tools and identifying what you need. Then, hit the stores or browse online to fill in the gaps. You’ll be amazed at how much smoother your DIY projects go with a well-equipped tool kit. Happy DIYing!
Recommended Gear
Disclosure: As an Amazon Associate, we may earn from qualifying purchases at no extra cost to you.
Common Mistakes
- Buying too many tools without a clear purpose, leading to unused equipment.
- Using the wrong screwdriver type, which can strip screw heads.
- Neglecting to check tool condition, such as worn plier jaws or dull blades.
- Skipping safety gear, increasing risk of injury.
- Overloading storage shelves causing damage or accidents.
- Running out of battery power mid-project due to lack of spares.
- Ignoring tool maintenance, reducing tool lifespan and efficiency.
- Not labeling tool compartments, leading to wasted time searching.
)