Avoid These Mistakes in Safety Gear for DIY Cleaning & Maintenance Before the Holidays (Winter, December)
Before You Start / What to Know Up Front
As the holidays approach, many of us dive into cleaning and maintenance tasks around the house. Whether you're prepping for family gatherings or simply trying to keep your space tidy, it's essential to be equipped with the right safety gear. I remember the first holiday season I decided to tackle a deep clean; I thought I could get away with just a pair of old gloves. Let me tell you, that was a mistake! Not only did I end up with sore hands from scrubbing, but I also inhaled some harsh chemicals that left me feeling dizzy. This article is for those of you who want to ensure safety while keeping your home sparkling clean. We’ll cover what you need to know about safety gear, common mistakes to avoid, and how to navigate your cleaning and maintenance tasks effectively.
Method Overview
The approach we’ll take in this article focuses on using appropriate safety gear while cleaning and maintaining your home. This method works because it minimizes exposure to harmful chemicals and physical hazards, ensuring you can perform your tasks effectively without compromising your health or safety. However, it’s important to note that this approach may not be suitable for every cleaning method, especially when it comes to heavy-duty tasks like mold remediation or dealing with hazardous waste—those situations often require specialized gear and professional help.
Deep Step Detail
Here’s a step-by-step guide to help you prepare for your DIY cleaning and maintenance projects safely:
- Assess Your Cleaning Needs: Before you grab any cleaning supplies, take a moment to evaluate what needs to be done. Are you cleaning out the garage, scrubbing the floors, or tackling the windows? Each task has different requirements, so knowing what you’ll be doing sets the stage for your safety gear. I once started a project without considering the extent of the mess in my garage and found myself overwhelmed halfway through.
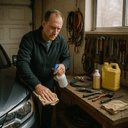
- Gather Your Safety Gear: Make sure you have the following items:
- Chemical-resistant gloves
- Safety goggles
- A mask or respirator
- Non-slip shoes
- Long-sleeve clothing
- Knee pads (if you’ll be on the floor a lot)
Don’t skip on this step! I can’t tell you how many times I’ve seen friends rush in without proper gear only to regret it halfway through the job. For instance, using rubber gloves specifically designed for chemicals can save you from skin irritation.
- Read Product Labels: Before using any cleaning product, read the label carefully. Look for safety warnings and instructions on how to use them. This step is crucial because some products can react poorly if mixed with others, and you want to avoid any hazardous situations. I learned this the hard way when I combined two cleaners and ended up with a noxious cloud.
- Ventilate the Area: Open windows and doors to ensure good airflow, particularly when working with strong chemicals. Proper ventilation reduces the concentration of fumes in the air, which can help prevent headaches and dizziness. I learned this the hard way when I was cleaning with bleach in a closed space and ended up feeling lightheaded. A fan can also help circulate air.
- Prepare Your Work Area: Clear the area of any obstacles and clutter. This will not only make your cleaning more effective but also reduce the risk of tripping or knocking things over. I always make it a point to have a clean workspace before I start, and it makes a world of difference. If you can't clear everything, at least create a defined workspace around you.
- Start Cleaning Methodically: Choose one area to clean at a time. This helps you stay organized and ensures you don’t miss spots. For instance, if you’re cleaning the kitchen, start from the top (like cabinets) and work your way down to the floor. This prevents any debris from falling onto already cleaned surfaces. I’ve seen too many DIYers jump around from room to room and lose track of their progress.
Troubleshooting & Fix-ups
Even with the best-laid plans, things can go wrong. Here are some common problems DIYers face during cleaning and how to handle them:
- Chemical Reactions: If you accidentally mix cleaning products and notice a strange smell or fizzing, immediately leave the area and ventilate it. If the reaction seems severe, call for professional help. Keep a phone nearby just in case.
- Skin Irritation: If you feel irritation on your skin after using a cleaning product, wash the area with soap and water immediately. If the irritation persists, seek medical advice. I always keep a mild soap nearby when I’m cleaning, just in case.
- Slips and Falls: If your floor gets slippery, take a moment to dry it off before continuing. If you can, use mats or towels to absorb excess liquid while you work. I’ve had my share of close calls when I forgot to wipe up spills.
- Eye Irritation: If any cleaning solution gets in your eyes, rinse them with water for at least 15 minutes and seek medical attention if irritation continues. Having a nearby water source can be a lifesaver.
Common Mistakes & How to Avoid Them
There are a few mistakes that I see DIYers make repeatedly when it comes to safety gear during cleaning and maintenance. Here’s how to avoid them:
- Skipping Safety Gear: Some folks think they can skip gloves or a mask for quick jobs. Trust me, even a small task can expose you to harmful chemicals or irritants. Always wear your safety gear, no matter how minor you think the job is. I’ve regretted this more than once.
- Ignoring Ventilation: Many DIYers forget to open windows or doors for ventilation. Always ensure proper airflow, especially when you’re using strong cleaners. This simple step can save you from headaches and other health issues. I often set a reminder to check ventilation.
- Not Following Instructions: I’ve seen people pour cleaning products without reading the instructions first. This can lead to ineffective cleaning or dangerous reactions. Always take time to read the labels. It’s a small step that yields big safety benefits.
- Using the Wrong Gear: Not all gloves are created equal. Make sure you use gloves that can handle the specific chemicals you’re working with. I once used regular kitchen gloves for a heavy-duty cleaner, and they melted! Don’t let that happen to you—invest in a good pair of nitrile gloves.
- Neglecting Footwear: Slipping on a wet floor can lead to serious injuries. Always wear shoes with good traction and avoid going barefoot or wearing flip-flops. I learned that lesson the hard way during a mopping session.
- Skipping Breaks: Cleaning can be physically demanding, and it's easy to push yourself too hard. Take breaks to avoid fatigue, which can lead to accidents. I learned this the hard way when I was scrubbing floors for hours and ended up with back pain. Set a timer for regular breaks to keep yourself moving safely.
Pro Tips & Lessons Learned
Here are some smaller tricks that can save you time, money, or frustration while cleaning and maintaining your home:
- Use a Spray Bottle: Instead of pouring cleaner directly onto surfaces, use a spray bottle to control the amount you use. This can help you stretch your cleaning products further and avoid waste. Plus, it can help you avoid splashes that can get on your skin or clothes.
- Create a Cleaning Schedule: Plan out your cleaning tasks to prevent overwhelm. Break larger projects into smaller, manageable tasks spread out over several days. I often find that scheduling time on my calendar helps me stay accountable and organized.
- Label Your Cleaning Supplies: Keep track of your cleaning supplies by labeling them. This will save you time when you’re looking for a specific cleaner and help you remember which ones require extra safety precautions. I use colored tape for quick identification.
- Keep a First Aid Kit Handy: Accidents happen. Having a first aid kit nearby can help you deal with minor injuries quickly. I keep one in my cleaning supply cabinet for peace of mind. Make sure it’s stocked with essentials like antiseptic wipes and band-aids.
- Use Natural Cleaners When Possible: Sometimes, simple solutions like vinegar and baking soda can do the trick without exposing you to harsh chemicals. Experiment with these natural options for safe cleaning. I often mix baking soda and vinegar for powerful scrubbing without the fumes.
- Have a Backup Plan: If you run out of a cleaning product, have a backup option in mind. This reduces frustration and keeps your momentum going. For example, if you run out of glass cleaner, a mix of vinegar and water can do the job.
Budget & Time Signals
Your budget and how much time you’ll spend on cleaning and maintenance can vary significantly based on the tasks at hand. Here’s a rough idea of what to expect:
- Basic Cleaning Supplies: Expect to spend around $20 to $50 for gloves, masks, and basic cleaners. If you have to buy more specialized equipment, like a respirator, it can push your budget up to $100. I’ve found that investing in quality gear pays off in the long run.
- Time Commitment: For a standard cleaning session, plan for 2 to 4 hours, depending on the size of the area and the depth of the cleaning you’re doing. For larger projects, like garage cleanouts, you might need a full weekend. I often set aside a Saturday morning for bigger tasks.
- Phased Approach: If you’re on a tight budget or schedule, consider breaking your cleaning into phases. Tackle one room or area at a time rather than trying to do everything at once. This approach also helps you avoid burnout. I like to use a checklist to keep track of what I've accomplished.
When to Call a Pro
There are moments when it’s best to step back and call for professional help. Here are some clear thresholds and warning signs:
- Severe Mold Growth: If you notice extensive mold or mildew, especially if it’s more than a couple of square feet, it’s time to call a pro. They have the tools and training to handle it safely. Don’t risk your health over this.
- Hazardous Materials: If you encounter materials like asbestos or lead, stop immediately and contact a professional. These substances require specialized knowledge and equipment to handle safely. I’ve seen this happen in older homes, and it’s crucial to get expert help.
- Complex Equipment: If your cleaning involves heavy machinery or tools you’re not familiar with, don’t hesitate to call in an expert. It’s better to be safe than risk injury. I once avoided using a power washer until I had someone show me the ropes.
- Physical Limitations: If you have any physical limitations or health issues that make cleaning difficult, it’s wise to hire help. Your safety and well-being come first. Don’t hesitate to ask for assistance from a friend or professional.
- Persistent Health Issues: If you start experiencing ongoing health problems after cleaning (like breathing issues or skin irritation), consult a professional for advice. It’s better to be cautious and ensure your space is safe.
Conclusion
Cleaning and maintaining your home before the holidays doesn’t have to be a daunting task. With the right safety gear and a clear plan, you can tackle your projects with confidence. Remember to take your time, follow safety precautions, and don’t hesitate to call for help if you need it. Your health and safety are paramount, and you deserve a clean home without the risks. So, gather your safety gear, create a plan, and dive into your cleaning tasks. You’ve got this! Start with one area today, and you’ll be well on your way to a sparkling clean home for the holidays.
More in Cleaning